Your daily reminder that everything is a lie.

Pretty much title, I know now that one must get a certain amount of work experience before getting a MBA, but how does someone go into the upper level of management within the Biotech industry (upper level marketing directors, C level execs, etc)?
submitted by /u/joejoseph519
[link] [comments]
Goodwin advised Staten Biotechnology B.V. on its strategic collaboration with Novo Nordisk A/S to develop novel therapeutics for the treatment of …
I am an Undergraduate Biology student who is between either going to Medical School or going into the Pharma Industry. Is it normal for students to try to get into an MBA program right upon graduation or do people gain experience in industry first?
submitted by /u/joejoseph519
[link] [comments]
Having a Knowledge base on your website can be an extremely valuable asset both for your customers and your employees. And if done right, a knowledge base can become a long-standing hallmark of quality assurance for your business. They can be a great solution for FAQs, Documentation, Software manuals, Tutorials, and much more.
In this tutorial, I’m going to show you how to add a knowledge base to your website with Divi. To do this, I’ll be using the Echo Knowledge Base plugin (free version) which has some helpful configuration options that make it easy to organize and style your knowledge base pages. I’ll also show how you can style the knowledge base main page and article pages using the Divi Builder.
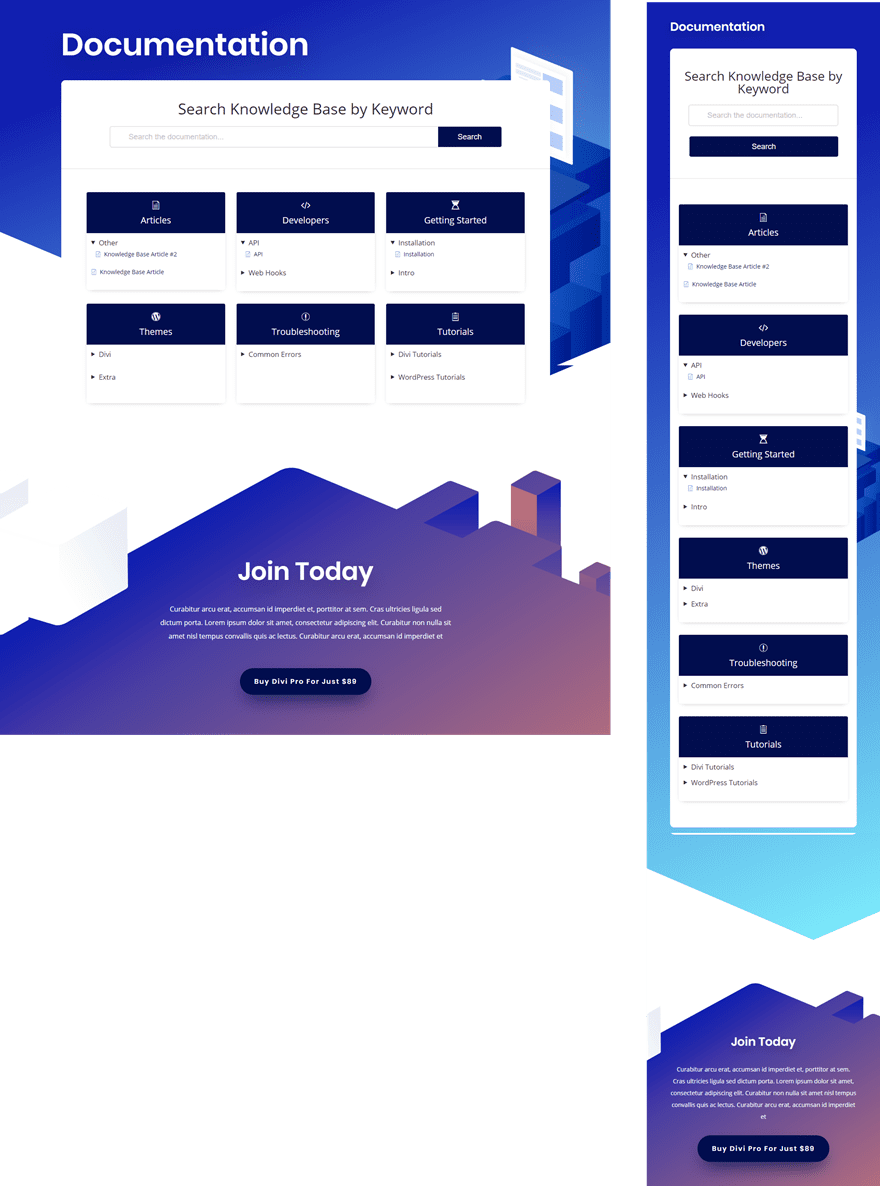
Here is a sneak peek of what we will be building.
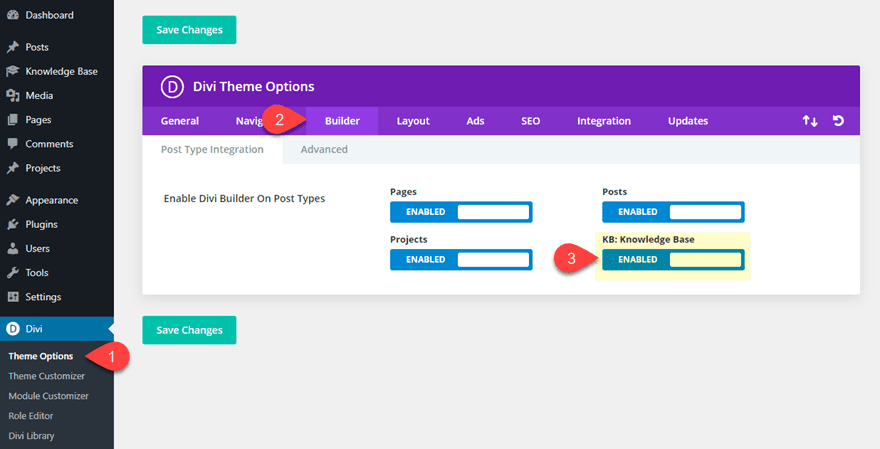
Divi makes it easy to provide support for certain third party custom post types. Since the knowledge base plugin uses their own post types for articles, you will need to enable them in Divi. This will allow you to use the Divi Builder to edit those articles.
To do this, go to your WordPress Dashboard and navigate to Divi > Theme Options. The click the Builder tab and enable the post type “KB: Knowledge Base”.
In order to get a good idea of what the design will look like, you will need to have some Knowledge base articles and categories setup. For now, it is okay to use mock content.
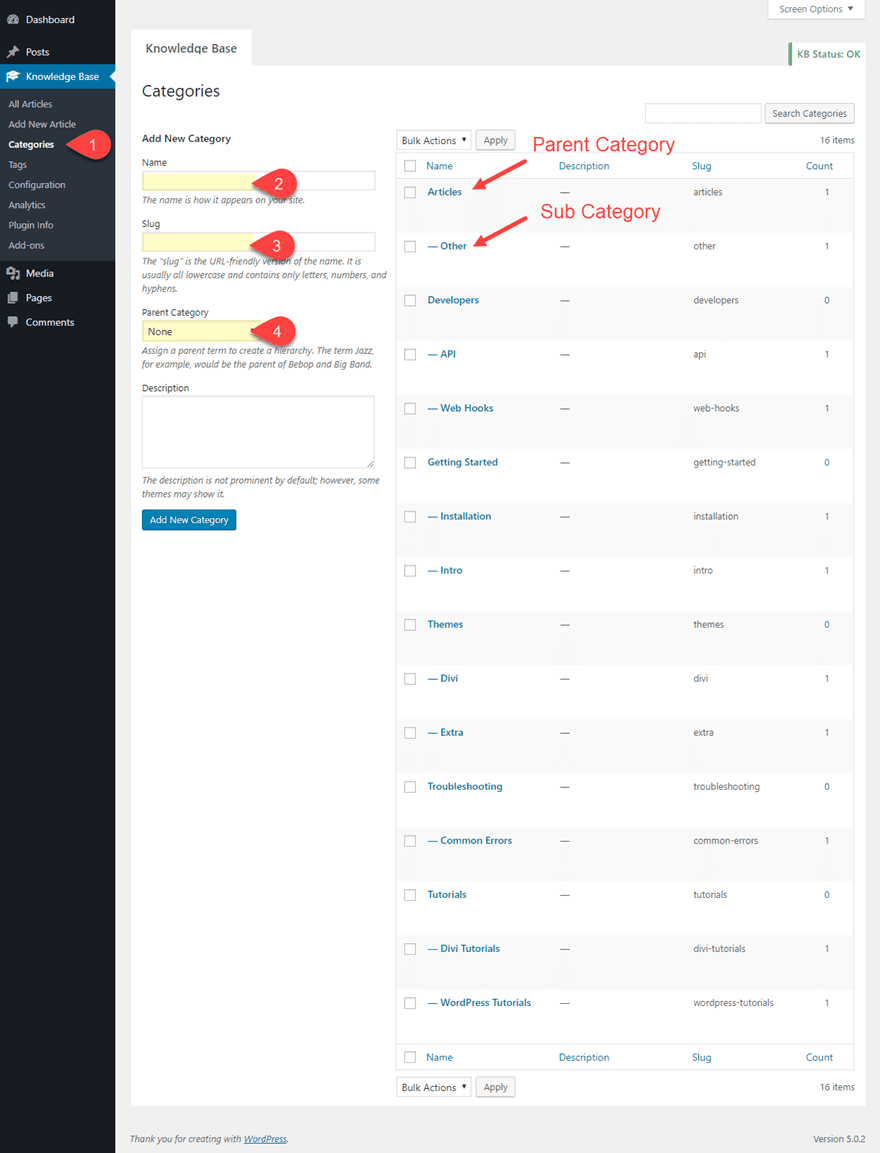
You can create knowledge base Categories just like you would for normal post categories in WordPress.
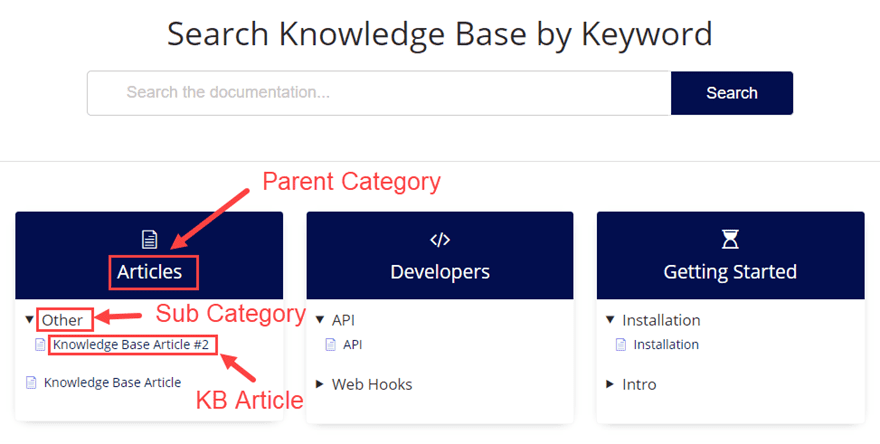
To do this, navigate to Knowledge Base > Categories. Then add a Name, Slug, and Parent Category (if applicable) for each of the categories you are going to use for the knowledge base articles. For this example, I added 6 parent categories each with a couple of subcategories.
To give you an idea of where this is going, here is how the Parent Categories and Subcategories will be displayed on the knowledge base main page.
Right now your categories are in place but there are no articles assigned to them. You will need to create articles and assign one (or more) of the categories you created to each one.
You can create a new article just like you would a new post in WordPress. Navigate to Knowledge Base > Add New Article. Then add a Title and assign a category to the article. You will notice the Divi Builder can be activated because we enable this post type in Theme Options. I’ll share some tips for doing this later. But for now, you can just add some mock content default WordPress editor. After that publish the article.
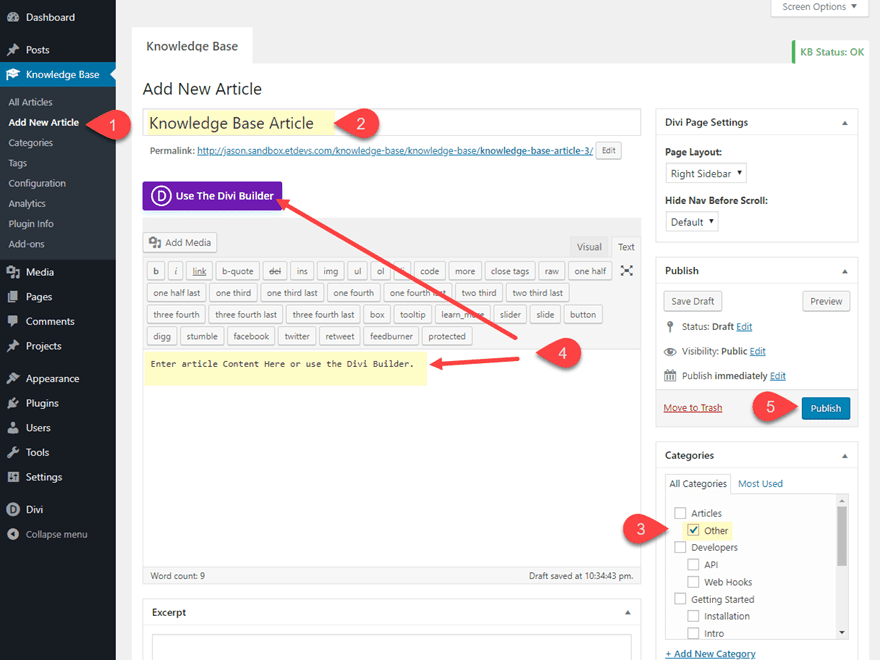
Continue this same process to create all of the articles needed so that each category has at least one article assigned to it.
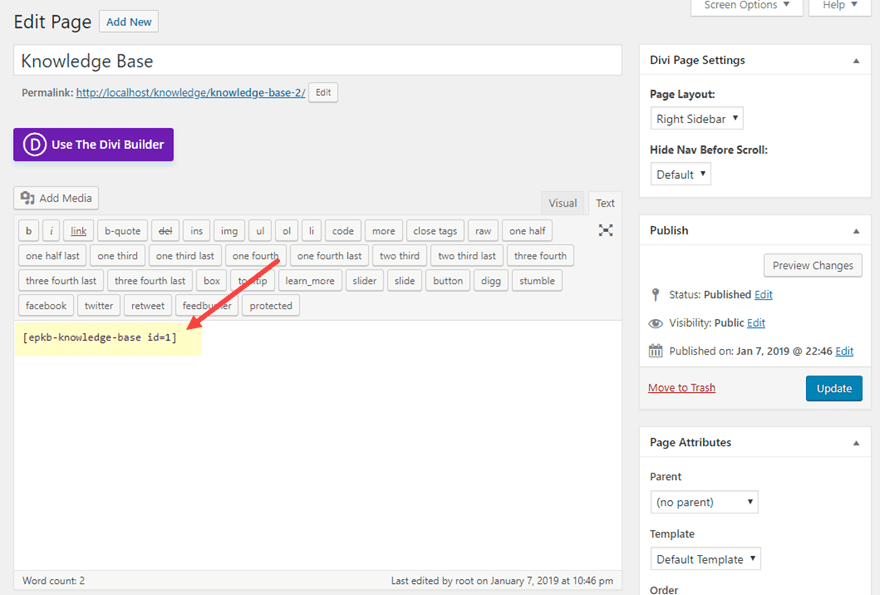
Once you activate the plugin, a knowledge base page is automatically created for you. This page has the necessary shortcode needed to deploy the main knowledge base.
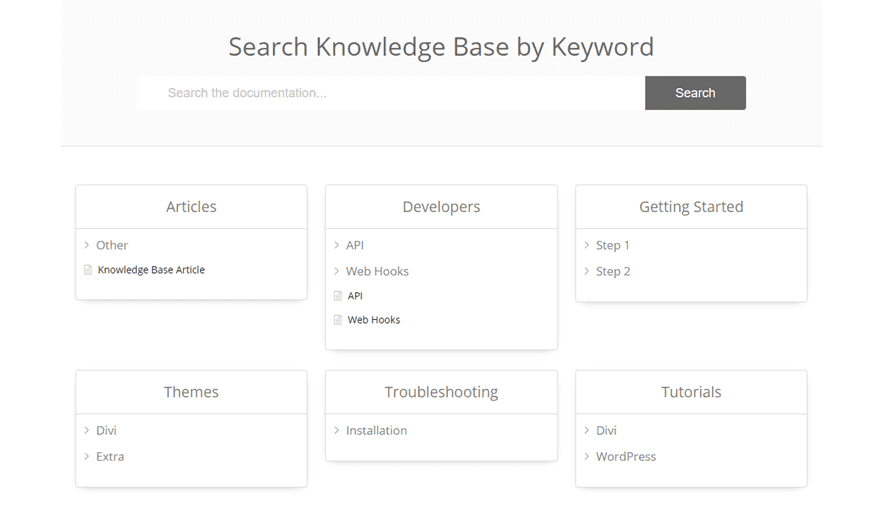
Here is what the page will look like by default.
The knowledge base plugin has a lot of useful options for configuring the knowledge base to match the design of your website. There are customizable options for the Main Page, the Article Page, and the Archive Page.
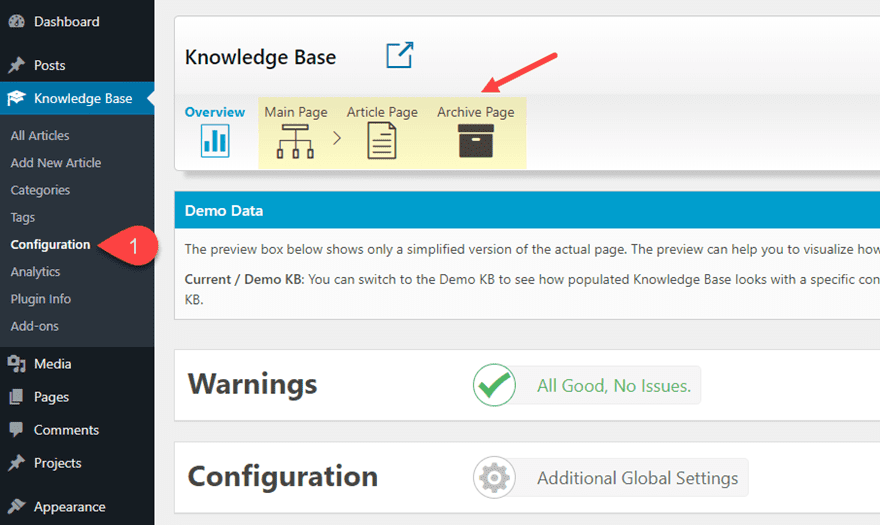
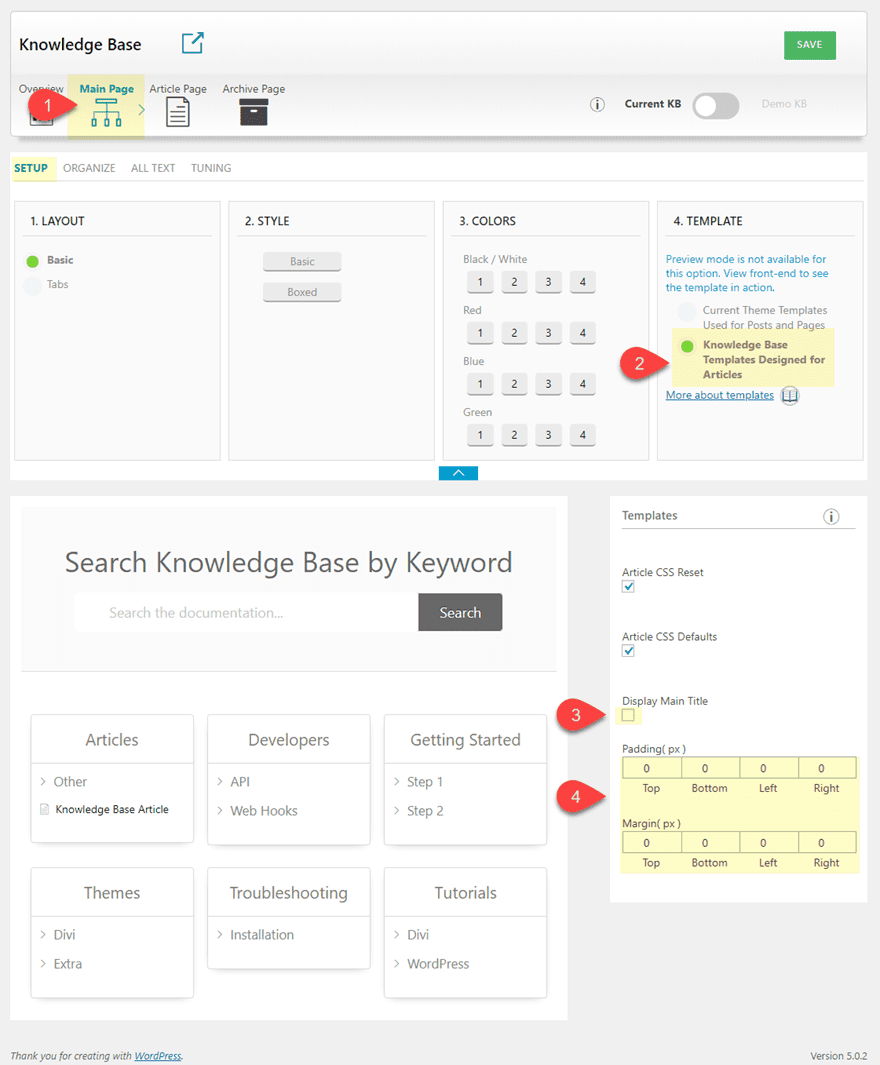
First, click on the Main Page button at the top of the knowledge base configuration page. Under the setup tab, you can leave the default layout style and colors. But for this example, I’m going to change the template option to use the “Knowledge Base Templates Designed for Articles”. I do this mainly because it allows you to customize the Archive Page with different premade style options. But, if you want to keep the Divi Theme Templates for this, you can keep the option selected to “Current Theme Templates Used for Posts and Pages”.
In the Templates popup, deselect the Display Main Title option and set the all paddings and margins 0px. This will allow us to use the Divi Builder for the page title and spacing.
For now, I’m going to leave the Organize and All Text options to their defaults, but feel free to change those on your own. Under the Organize tab, you can even drag and drop your categories in whatever order your want. And the All Text options allow you to change the wording used throughout the page (i.e. the search Title and button text).
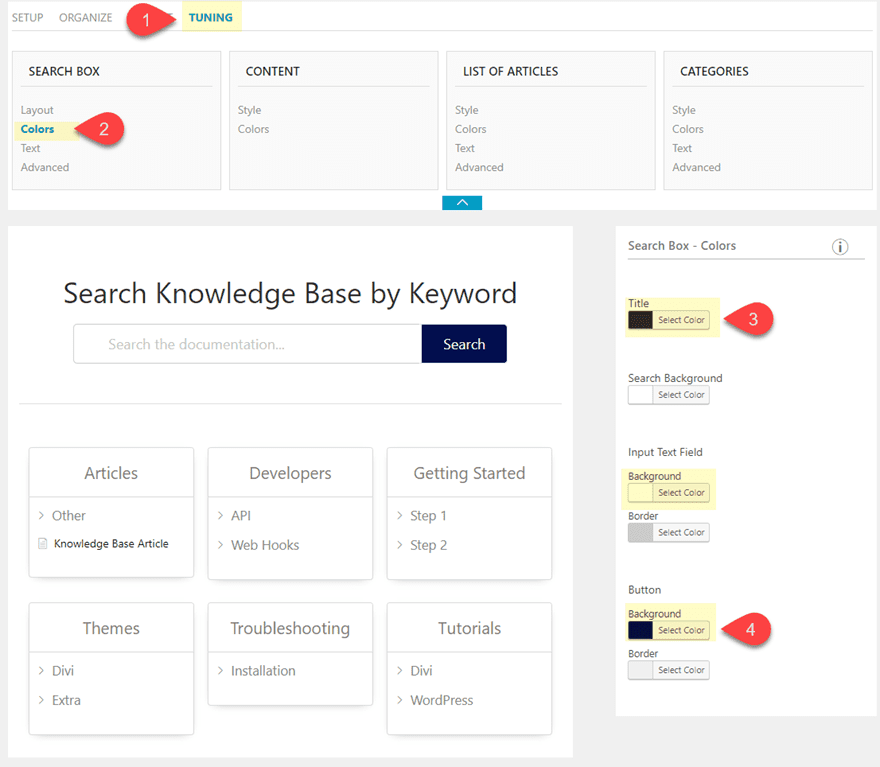
Next, click the Tuning tab. This is where most of the styling takes place for the main knowledge base. I’m not going to use all of these settings, but I will change up some colors and add some icons. This how you can match the knowledge base with your premade Divi Layout. Since I plan on using the Digital Product layout pack, I’ll be using those colors to style the knowledge base page.
Under the search box category, select colors and update the following:
Title: #333333
Search Background: #ffffff
Button Background: #091c4f
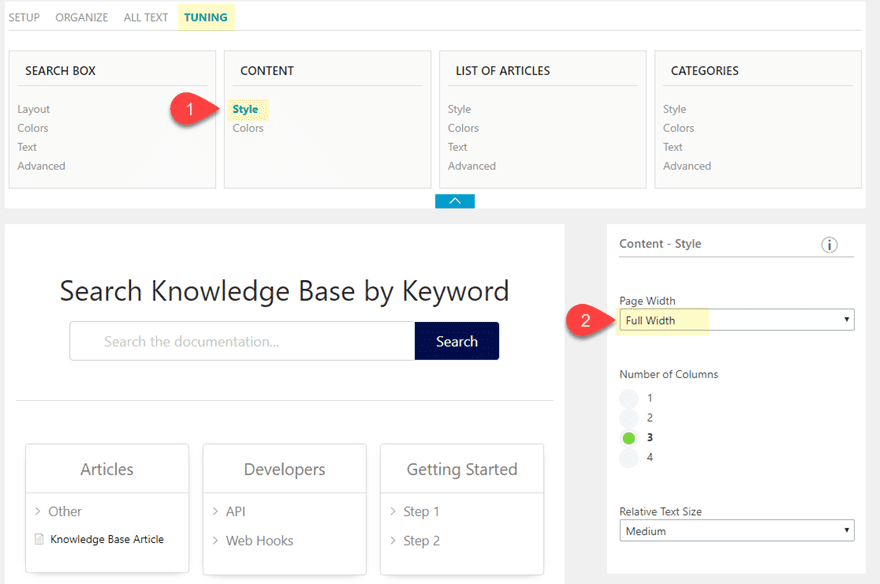
Under the Content category, select Style and update the following:
Page Width: Full Width
Under the List of Articles category, select Style and update the following:
Icon: Arrow Triangle
Articles List Height: 100px min height (this is useful for making all boxes the same height)
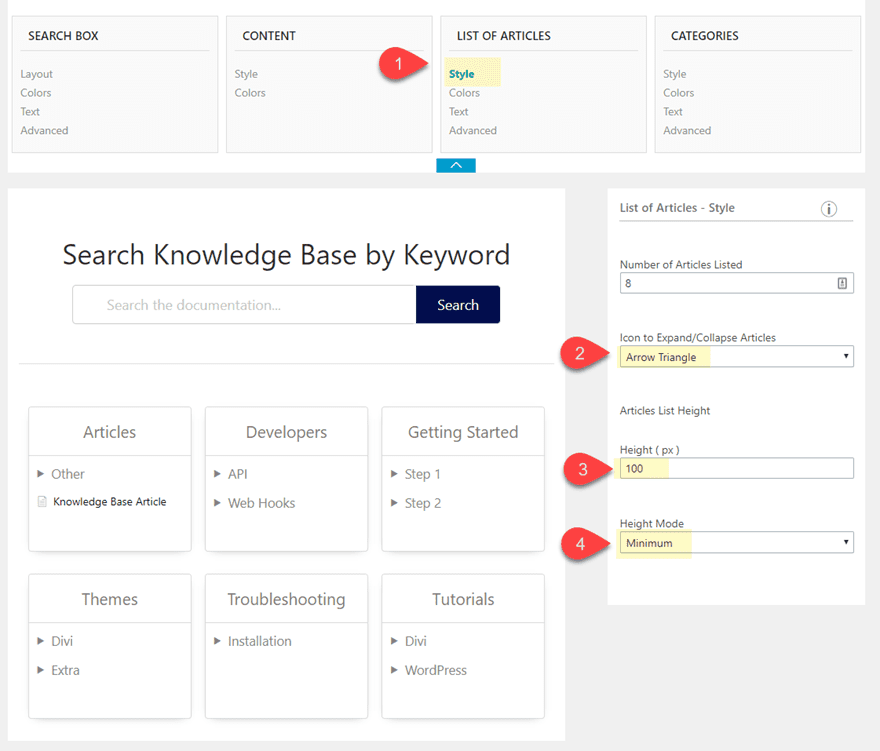
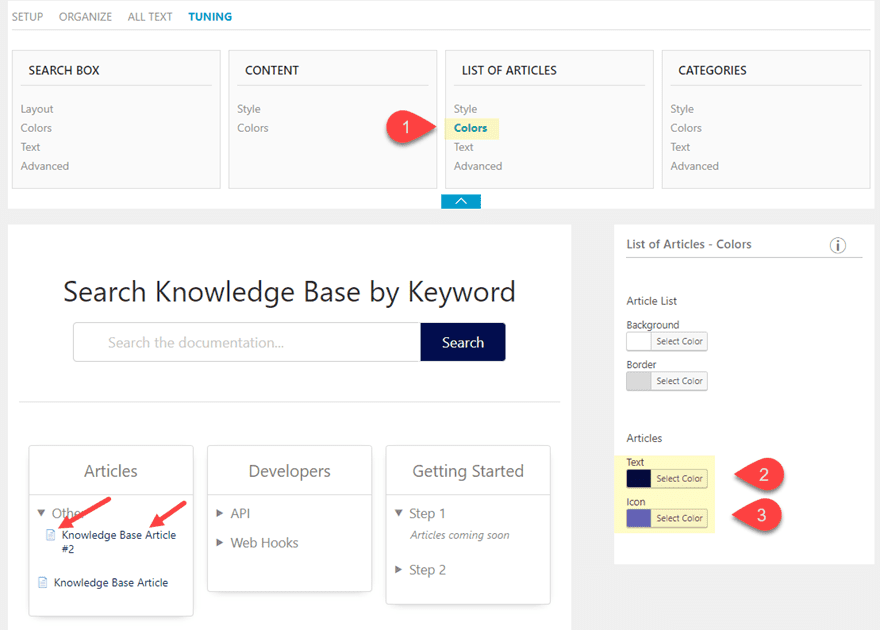
Then select Colors and update the following:
Articles Text: #091c4f
Articles Icon: #6767ef
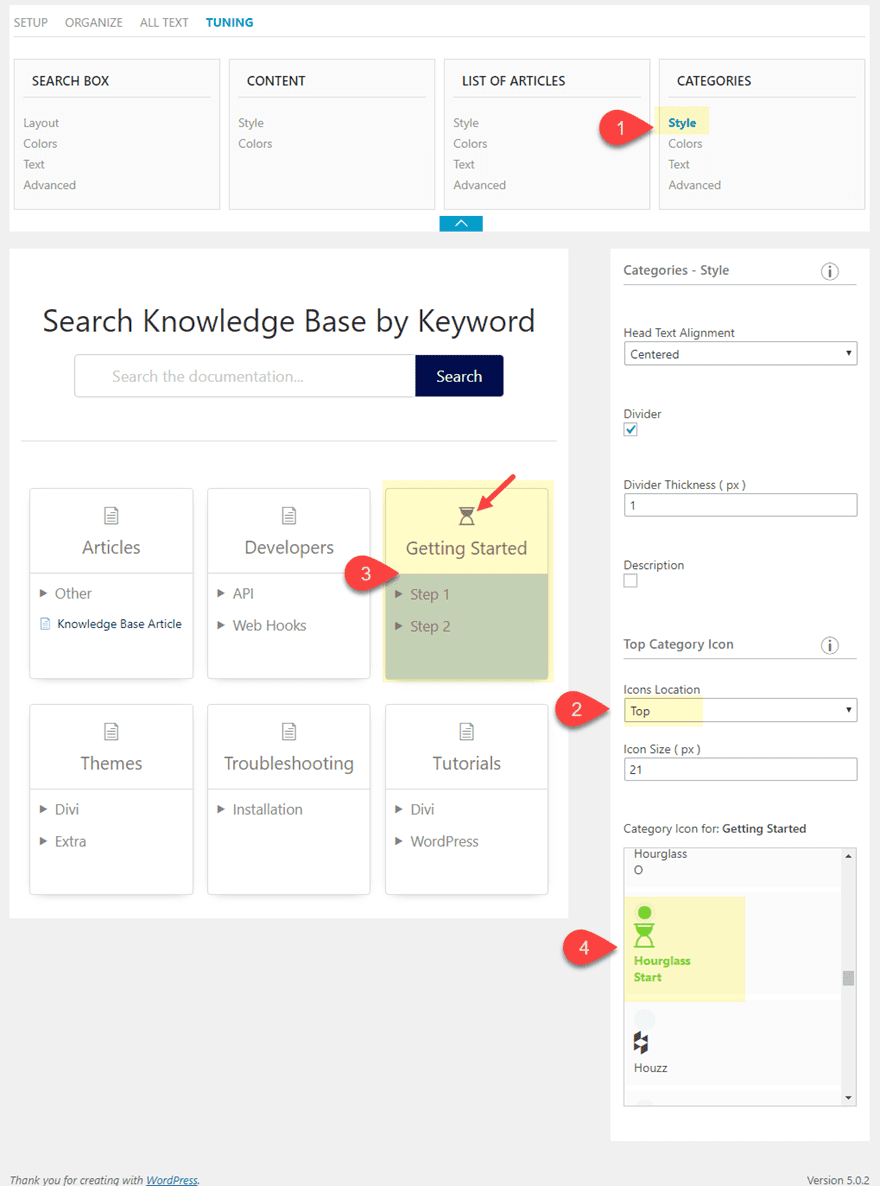
Next, under Categories, select Style and update the following:
Icons Location: top
Then Click on one of the category boxes in the preview to select it. Then select a Category Icon that specific category. Do this for each of the Category boxes.
There are over 500 icons to choose from!
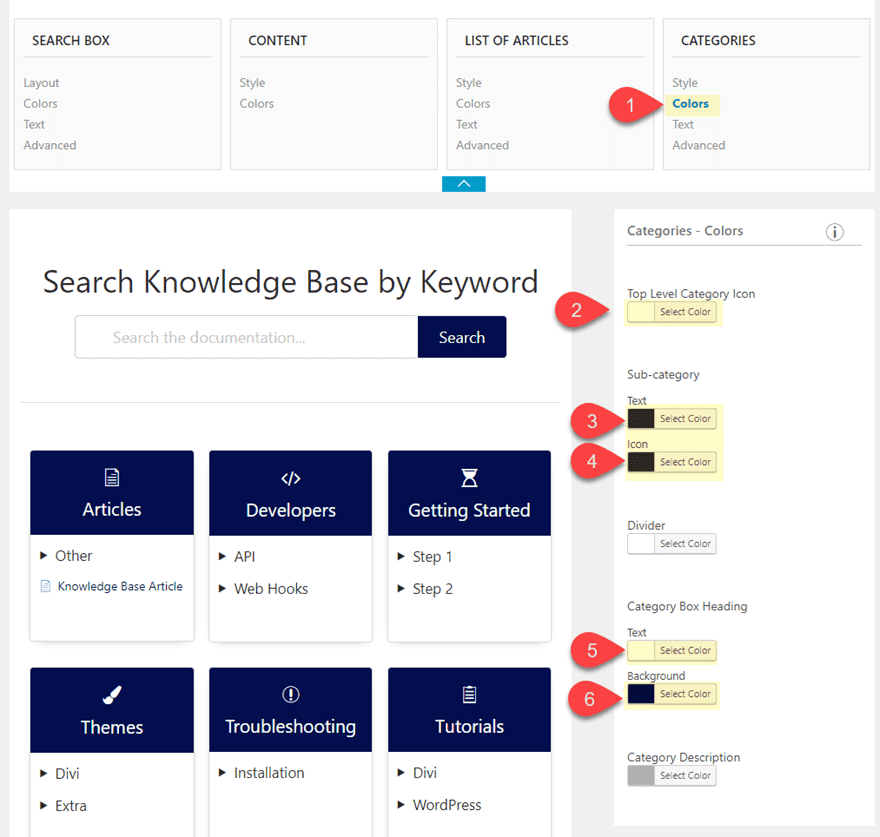
Then select Colors and update the following:
Top Level Category Icon: #ffffff
Sub-category Text and Icon: #333333
Divider: #ffffff
Category Box Heading Text: #ffffff
Category Box Heading Background: #091c4f
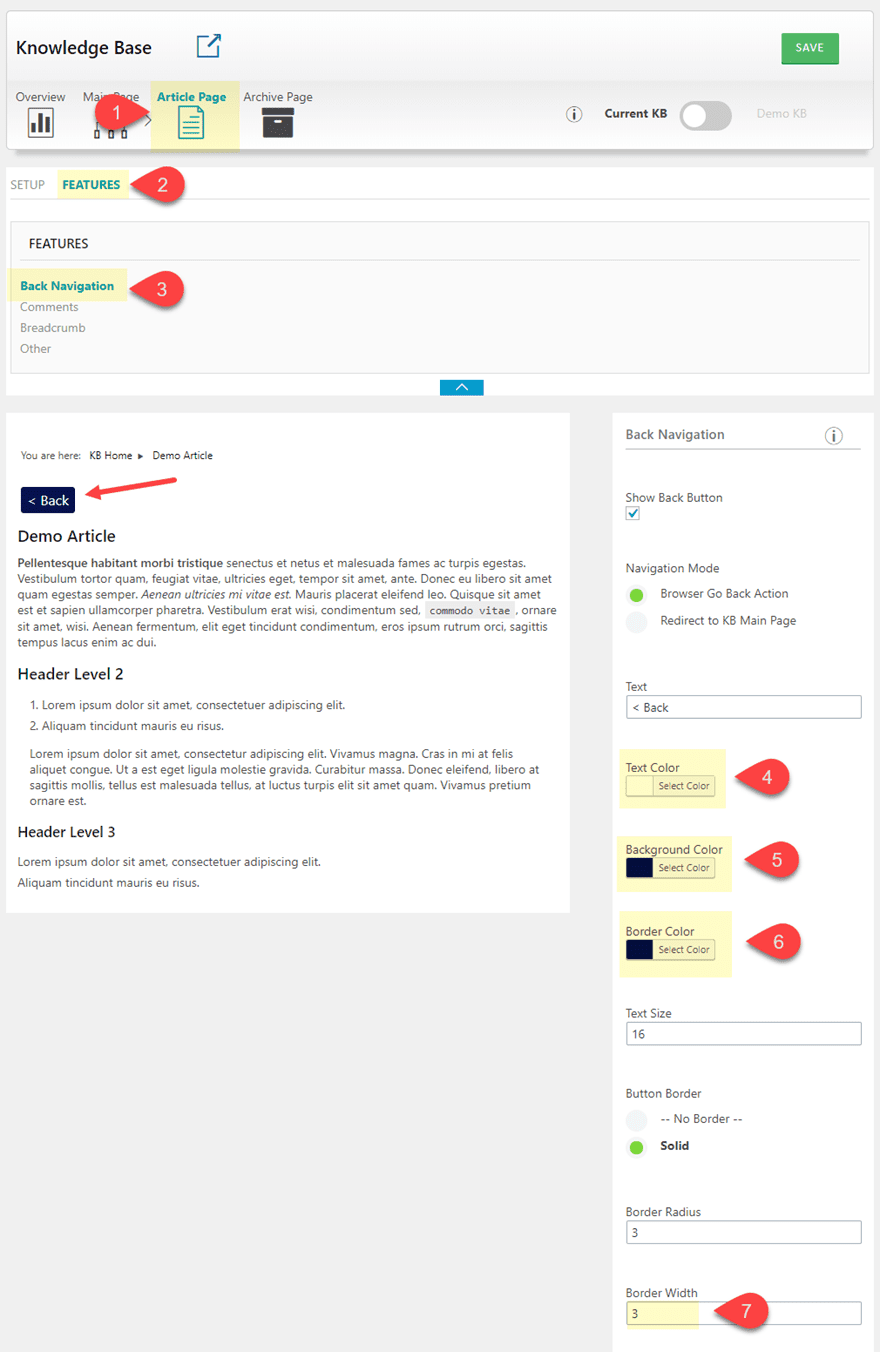
Now that we have the Main Page configured, click on the Article Page at the top of the page. Then click on the features tab. Here you can customize elements like the back button and breadcrumbs which will show up at the top of the article layout.
For now, I’m just going to match the back button with the premade layout I’ll be using for the article page. Under Features, select Back Navigation and update the following:
Text Color: #ffffff
Background Color: #091c4f
Border Color: #091c4f
Border width: 3px
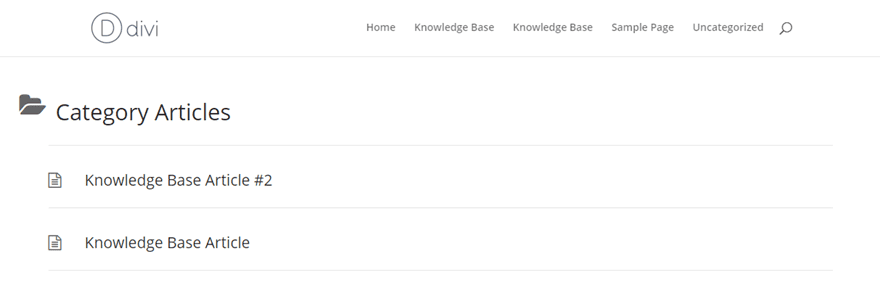
To change the layout of the archive page, click “Archive Page” at the top of the page. Under the setup tab, you will see a drop down list of the different styles available. I’m keeping the defaults but feel free to experiment with the other styles.
Here is an example of what a category archive page looks like with the default Style 1.
Now that we have completed the configuration of our Knowledge base pages, we are ready to complete the design of the knowledge base main page with the Divi Builder.
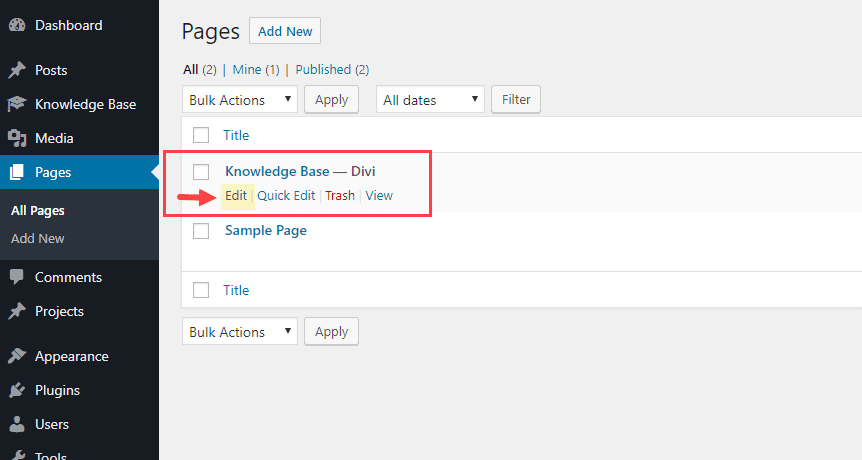
First, go to edit the page Titles “Knowledge Base” that was created automatically by the plugin.
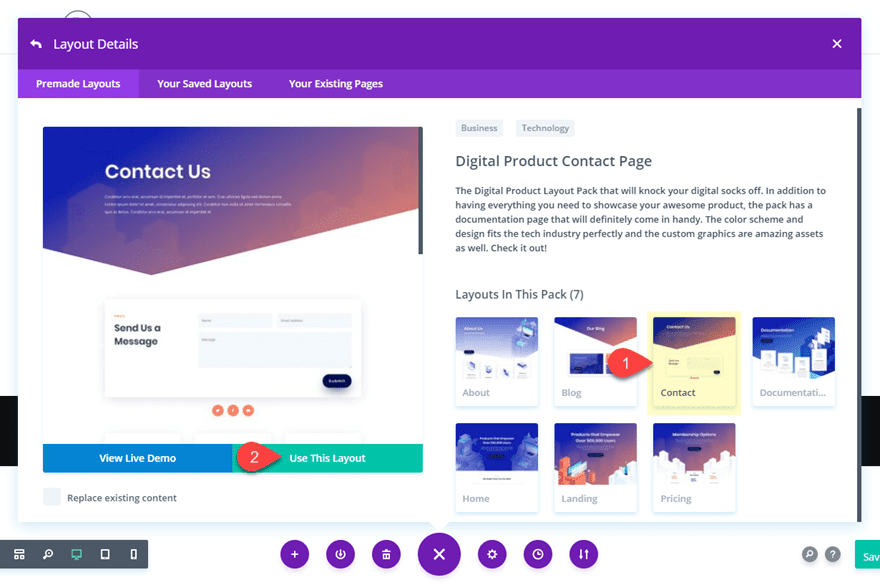
Then Deploy the Divi Builder. Select the option “Choose a Premade Layout” and then from the Load from Library popup, select the Digital Product Layout Pack. Then deploy the Documentation Page Layout to the page.
After the layout loads onto the page, select “Build on the Front End”.
You will see that the top section holds the text module with the shortcode that displays our newly styled knowledge base.
Now all we need to do is move it to the place we want it to be within the premade layout and adjust the design as needed with the Divi Builder options.
For this example, I moved the text module holding the KB shortcode directly under the text module with the Title “Documentation”.
Then I deleted everything until the only thing I had left was the top section containing one row with the “Documentation” Text Module and the text module containing the shortcode. I also kept the bottom section with the CTA.
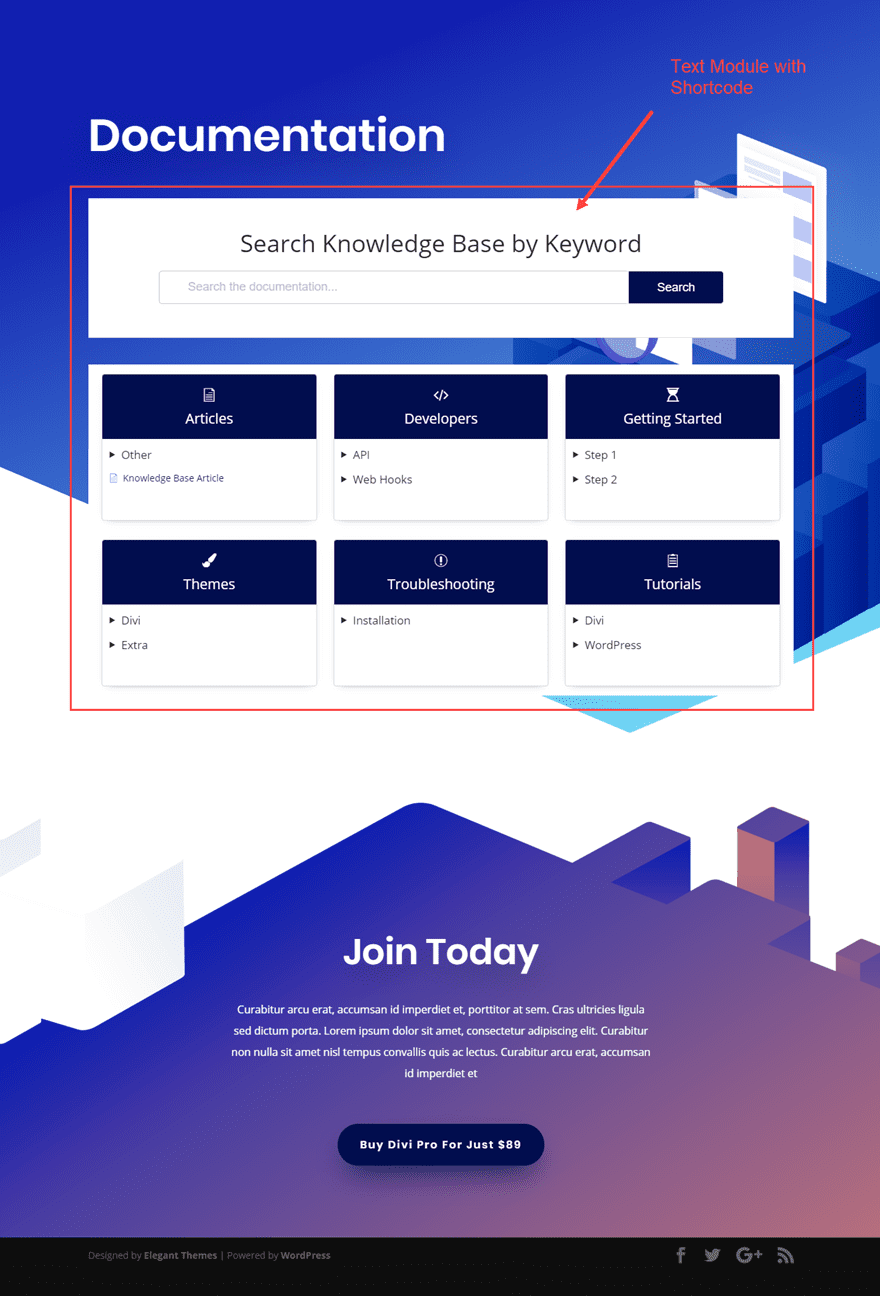
To finish off the design, open the settings of the text module containing the shortcode and update the following:
Background Color: #ffffff
Text Font: Poppins
Rounded Corners: 10px

Here is the final design.
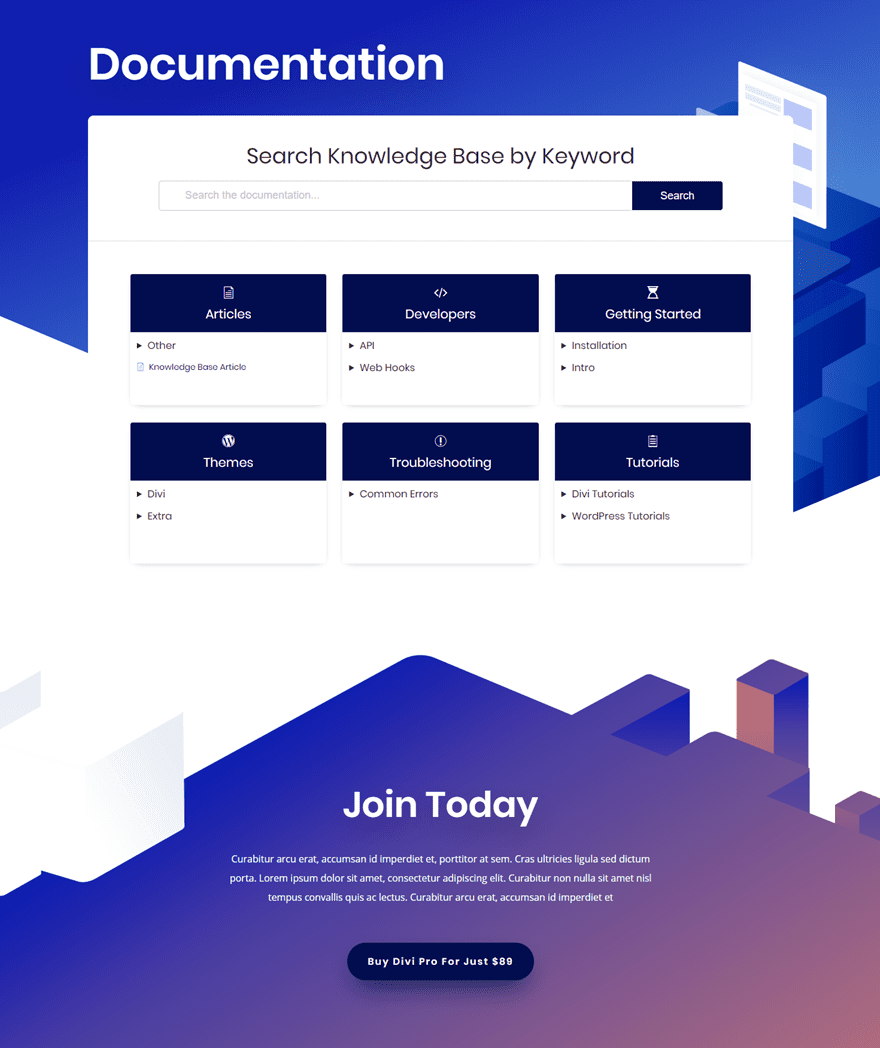
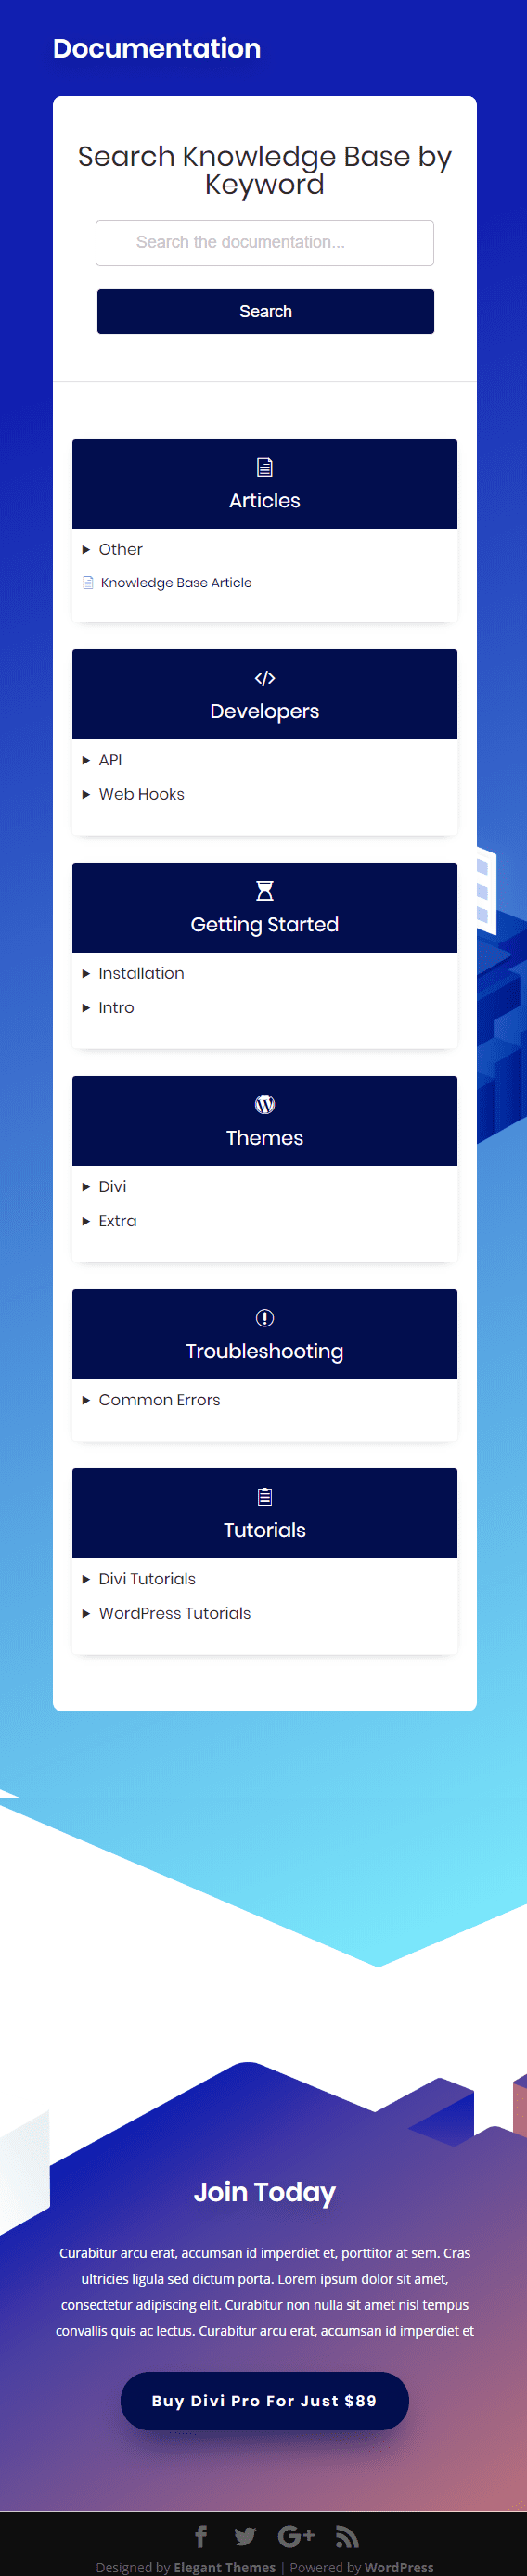
And it also adjusts nicely on mobile as well.
Because we activated the KB Knowledge Base post type in Divi Theme Options, you can design your articles using the Divi Builder. The Knowledge base article template does limit the Divi Builder to the content under the Page Title and Breadcrumbs, and back button. It also limits the divi builder content to a max width of 1080px.
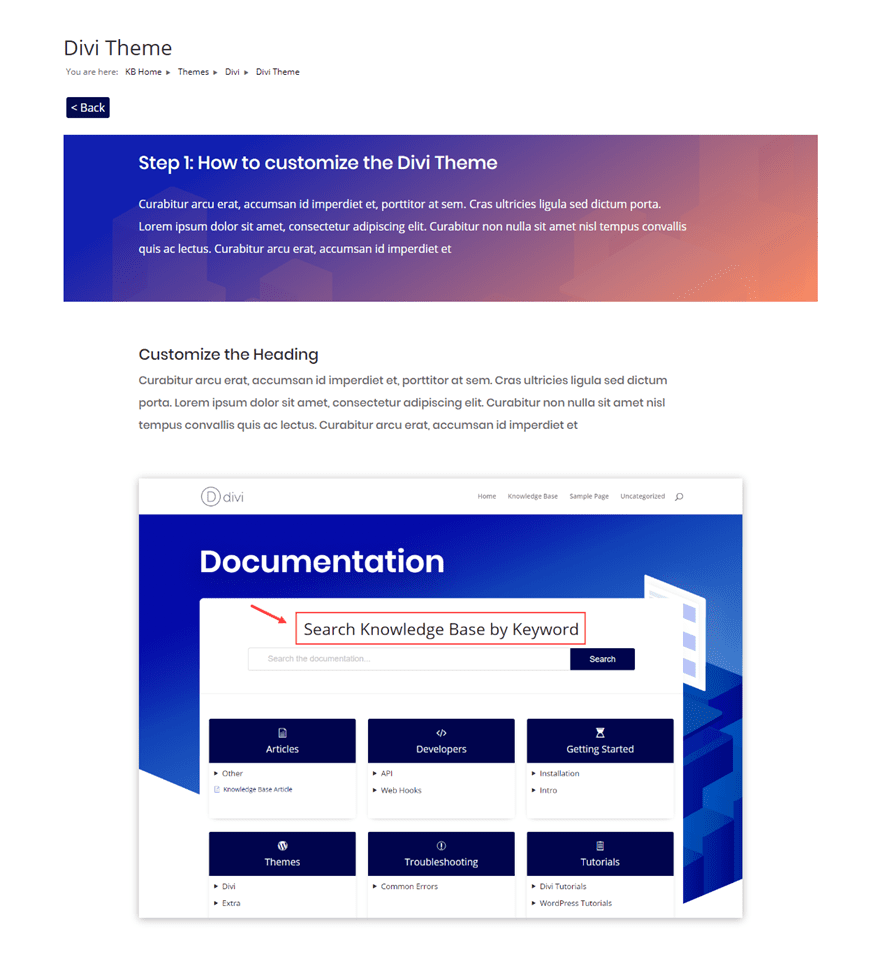
For this example, I’m going kickstart the design of a knowledge base article with a premade layout. To do this, go to edit one of the articles and deploy the Divi Builder. Select “Choose a Premade Layout” and from the Load from Library Popup, select the Digital Product Layout Pack and deploy the Digital Product Contact Page.
Now look at what the article looks like. Notice that the Divi Builder content sits directly below the Article Title, Breadcrumbs, and back button which are not customizable by the Divi Builder.

But you still have some powerful customization options for the content that does allow the Divi Builder. You can use the top section background of the contact page layout to search as a section background for the different sections (or steps) of the article. And you can easily add screenshot using the image module. Basically, you have the limitless potential of the Divi Builder for the entire article.
Here is a simple example of what an article page designed with Divi could look like.

Of course, you could add some custom CSS adjust the width of the article container in order to get a full width layout. And you could add some code to hide the Title and then use Divi’s dynamic content to place the article title anywhere you want within the Divi Builder.
The Echo Knowledge Base plugin is surprisingly powerful, even without all of the premium addons available (they are worth checking out though).The configuration options allow you organize and style your knowledge base pages to match your Divi layout easily. To top it off, you can even use the Divi Builder to design your knowledge base page and article page. I hope this tutorial was helpful for those looking to add knowledge base to your Divi website.
I look forward to hearing from you in the comments.
Cheers!
The post How to Create a Knowledge Base for Your Website with Divi appeared first on Elegant Themes Blog.
Google Ads amounts to billions of dollars in revenue for the search engine giant, but what about your revenue?
Standing out in this competitive-and, let’s face it, cluttered-environment can be a huge challenge for advertisers, especially if they’re just starting out. There’s only so much space on a search results page to go around, after all.
As we enter the 2018 holiday season, it’s the right time to take a good, hard look at your stale ads. It’s time to breathe some new life into them.
With that in mind, here are the features the pros use to stand out from the competition:
Google made their standard text ads larger by introducing expanded text ads (ETAs) in 2016. The increased character count was a boon for advertisers because it enabled messaging to reflect more of the advertiser’s key incentives.
Experts jumped on this new format immediately, even though Google didn’t require they switch until January 2017. Even then, advertisers could continue to run standard (shorter) ads, but they couldn’t edit them or launch new ones.
Some people hesitated, but advertisers who were slow to switch were at a disadvantage compared to those who immediately moved to the new format. The go-getters ended up with a huge head start since ETAs proved to have higher clickthrough rates (CTRs) than standard ads.
(And good CTRs = good quality scores = lower CPCs = better ad positioning.)
In August, Google further expanded their text ad format-expanded expanded text ads?-but taking advantage of these new character limits is still optional (hint: you should use them).
The latest iteration of expanded text ads introduces a second headline and more characters to all text fields, making text ads even more prominent. Here’s what’s new:
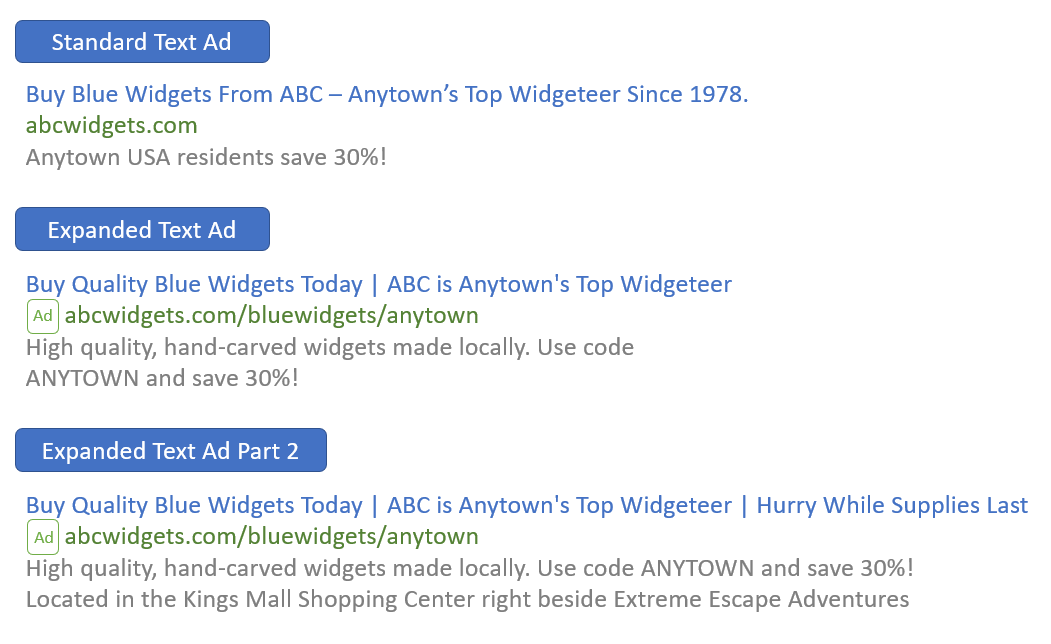
And here’s a comparison of the three ad formats:
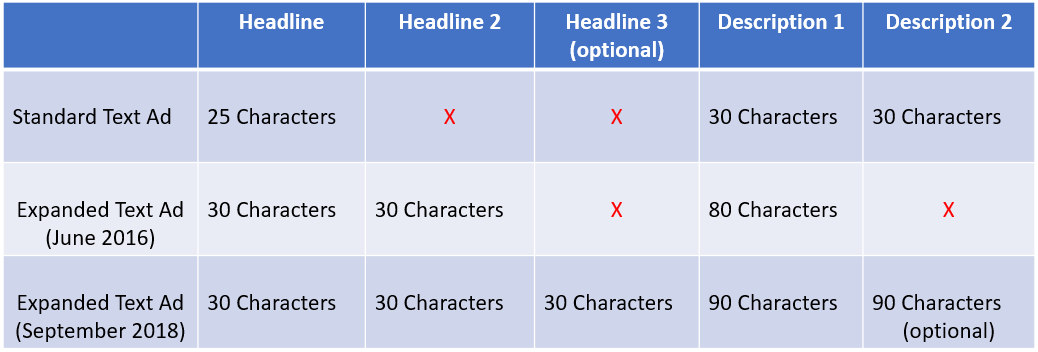
These longer character counts may not sound like much-oh boy, ten more characters!-but they add up and can have a significant impact on how your ads look (and how they convert). See for yourself how the three types of ads look in a side-by-side comparison:
The new ETAs feature up to 218% more text than the original “standard” format. As expected, search experts are already updating their ads to capitalize on the latest change-and this time you should too!
Even though the extra headline and description won’t show up all the time, they’ll help you stand out when they do by making the ad itself bigger. The third headline also gives you an extra thirty characters of highlighted blue text at the top of your ad.
Ad extensions are optional snippets of text that users can append to their ads. Google introduced the first extension-sitelinks-way back in 2009. These short links appear beneath the ad and direct searchers to different pages of the advertiser’s website.
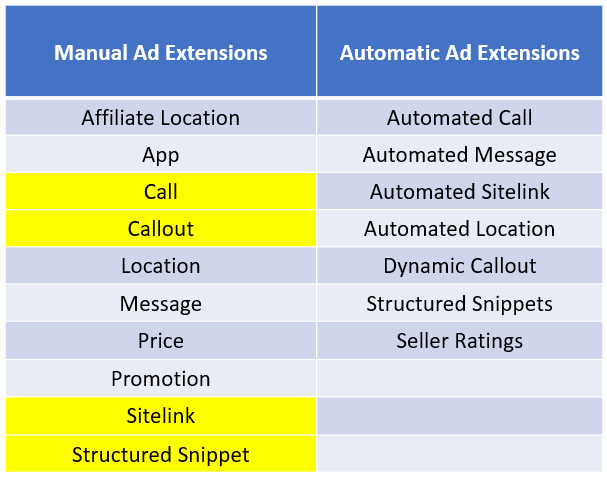
But why stop there? There are now ten different types of manual extensions and six automated extensions that advertisers can use to compel more clicks:
On average, an ad’s CTR has the potential to improve by 10-15% per extension. Aside from adding functionality, extensions increase the surface area of your placement and are free to implement, so they’re a no-brainer.
Though every ad extension is potentially useful, there are four (highlighted in yellow above) that you must use (if you’re not already). This is because they’re easy to implement and they allow you to feature critical incentives and information about your business that would otherwise take up valuable ad copy.
Sitelinks are valuable because they allow you to link deeply into your site. The number of sitelinks associated with your ad varies from 2 to 8. A great tip is to create specialty landing pages for each sitelink which are goal oriented and customized to the link. You can customize sitelinks at the ad group level too, making them even more relevant to specific searches.
Callout extensions can be up to 25 characters each and are not clickable. They promote features, benefits, and selling points of your business. They’re also a great way to highlight specific qualities of your business that you don’t have room to showcase in your primary ad copy. For instance, 250 5 star reviews, 5 convenient locations, all credit cards accepted, etc.
Call extensions add a phone number without wasting any of the primary copy. On mobile devices, a callout extension lets people tap a button to call your business directly. Implementing call extensions is quick and easy, so you should include them in all applicable ads.
This extension gives users the option to include a list of products or services beneath their ad. Structured snippets contain a category header (e.g., services) followed by a list of items (e.g., pet grooming, pet sitting, dog training, de-shedding).
Using all of these snippets is a great way to differentiate your ad from competitors’ ads. You can get creative too. For example, if you’re a B2B database host, you could list the features included in your service (e.g., Cloud Automation, Advanced Security, Easy-To-Use Data Browser).
It’s worth noting, though, that when it comes to the categories you can choose, you’re restricted to Google’s preset list. The full list of snippet categories (headers) is available here. Here are some other structured snippet examples based on different ones:
Using a few of the available extensions creates more opportunities to capture your prospects’ attention. It can even push your competition further down the page!
Here’s an example of how an ad would appear if all the above extensions showed at once:

Implementing ad extensions along with the latest ETA format is sure to get advertisers more clicks. Yet this can be a double-edged sword because (sadly) most of us don’t have an unlimited budget.
Fortunately, there are some settings and features that you can (and should) use to minimize clicks from unqualified traffic. The settings we’re going to focus on are bid modifiers, geotargeting, remarketing for search ads (RSLA), ad scheduling, and negative keyword lists.
Bid modifiers, or adjustments as Google calls them, enable you to increase or decrease bids based on when and how people search. Bid modifiers can apply to devices, locations, ad scheduling, and more. Advertisers bid up or down by percentages.
For example, if you want to bid more aggressively on mobile searches, you can adjust your bids to +30% for mobile devices. Likewise, if you want to appear for desktop searches, but would rather pay less for these types of clicks, you can adjust your bids to -30% for desktop devices.
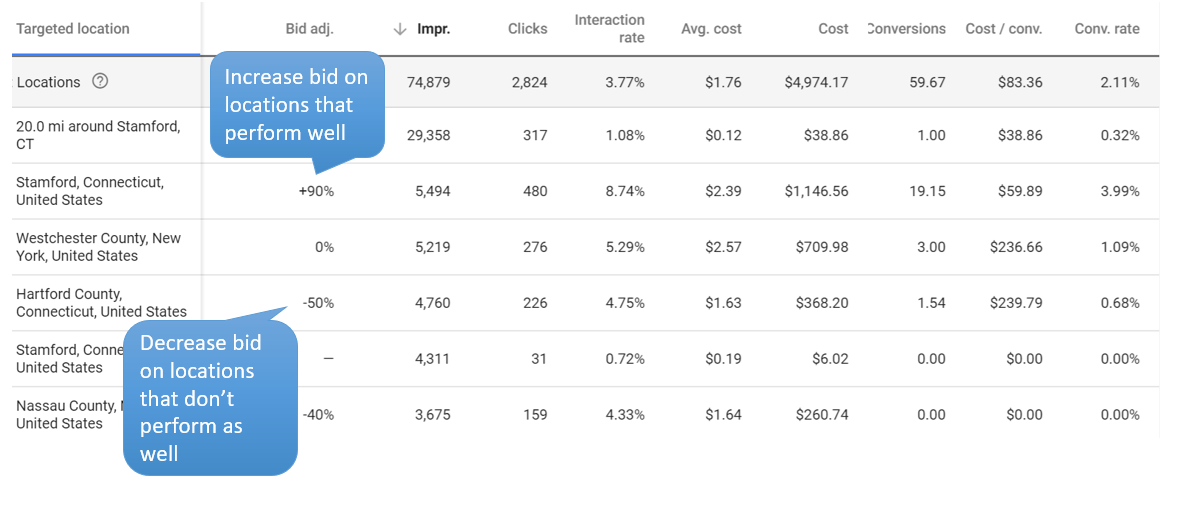
There’s more to geotargeting than just showing your ads in your desired locations. You can also refine where your ads appear by excluding certain locations and regions. You can get granular with this too by increasing or decreasing bids to your targeted areas using bid modifiers.
Geotargeting improves your ROI by minimizing clicks from unqualified prospects (e.g., people outside of your service area, neighborhoods below a certain income threshold, etc.). So it’s well worth the time it takes to set up and refine.
Maybe you’re not open on weekends. Maybe no one is operating the phones after 8 pm every night. Maybe your strongest return on ad spend occurs between the hours of 10 am and 1 pm every day. Once you figure out the best time of day for your ads to appear, you can use scheduling to choose exactly when they show. This is an especially great feature when you have a limited budget.
Remarketing isn’t just for display ads anymore! This feature allows you to target search ads to people who have already visited your site. Your ads then appear when they search on Google for the keywords you’re bidding on. You can either append RSLA lists to existing ad groups or create groups that only show ads if a searcher is on your remarketing list. Google provides detailed instructions for setting up RSLA campaigns. It’s definitely worth investing the time to read.
You can ensure your ad isn’t triggered for undesirable keywords by creating negative keyword lists and applying them at the account, campaign, or ad group level. The new Google Ads interface makes creating and assigning negative keyword lists simple. Create themed lists (e.g., competitors, locations, common terms) and assign them based on account performance or structure.
The good news is that there are things you can (and must) do to make your brand stand out and to ensure it’s reaching the most qualified prospects.
Google gives you some powerful tools to help improve the clickthrough rate of your ads, which contributes to a higher quality score. And, in turn, higher scores help drive down your cost per click, give you a higher impression share, and make your ad more likely to show up than your competitors’. They can even help your ad appear at the top of the search results.
It should go without saying (but we’re saying it anyway) that you should test all ads with different ad copy (and extensions) and then refine them based on actual performance.
Effective ads-even those loaded with ad extensions-are also only part of a good PPC strategy. Landing page optimization, tracking, A/B testing are critical practices for a successful campaign. Setting clear goals is also very important.
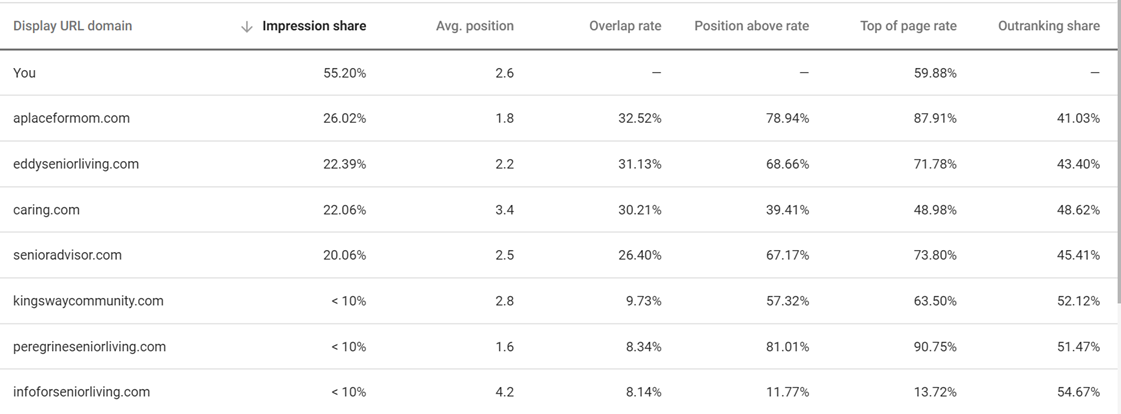
It’s also helpful to see what the competition is doing by reviewing competitor ads, landing pages, and incentives. Google’s Auction Insights report allows you to see who is bidding against you and their impression share compared with yours. Make sure you’re reviewing your competitive data monthly or quarterly. It can help you plan and revise your keyword and ad copy strategy.
Industry tools like SEMRush, KeywordSpy, and SpyFu also provide competitive information and enable you to automate monitoring. They’re worth checking out-you can be sure that most experts use them!
Even if you don’t dig deeper into the competitive data, however, implementing the above settings and ad extensions-as well as taking advantage of the latest expanded text specifications-will put you ahead of the competition. So get started today!

Do you appreciate a personalized experience?
Close your eyes and think about the last time you had a personalized experience and how it made you feel. Maybe it was a personalized workout prepared for you at the gym, or the comfort of having your car automatically adjust the seat to your specifications when you slide in to take a spin, or the barista that starts preparing your specialty drink as you walk in the door.
A personalized experience establishes goodwill, increases loyalty, and brings a smile to your face.
So when we planned our research calendar at Ascend2, we knew that personalization was a topic we needed to cover. But not just basic personalization, like including a prospects first name on an email, but the next step in personalization: hyper-personalization.
Hyper-personalization takes personalized marketing a step further by leveraging artificial intelligence (AI) and real-time data to deliver more relevant content, product, and service information to each user.
But what will hyper-personalization strategies look like in the year ahead?
Answers to this question are found in the new Ascend2 research report, Hyper-Personalization Strategies. The survey was fielded the week of November 26, 2018, and a total of 143 marketing professionals participated.
Here are a few of the survey results and some ideas on how you can use the findings to plan your 2019 marketing strategy.
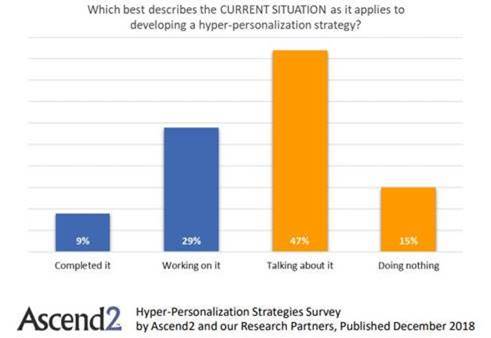
Only 9% of marketing professionals surveyed say they have completed the development of a hyper-personalization strategy. These are the early adopters. The majority, 62%, are either just talking about it or haven’t done anything about hyper-personalization yet. So if you start now and create and implement a hyper-personalization strategy, you will be a step ahead of your competition. Remember, “if you’re not the lead dog, the view never changes.” Be the lead dog and create a hyper-personalization strategy for your company.
Only 9% of marketing professionals surveyed say they have completed the development of a hyper-personalization strategy.
Click To Tweet
Improving the customer experience and applying data insights to decision-making are top priorities for 60% and 51% of marketing professionals, respectively. Any time you can improve the customer experience, you will reap the benefits. The more data you have about your audience, the ability to understand and learn from the data, and the skill to apply what you learn to customize the experience, will help you improve your marketing performance.
Improving the customer experience and applying data insights to decision-making are top priorities for 60% and 51% of marketing professionals.
Click To Tweet
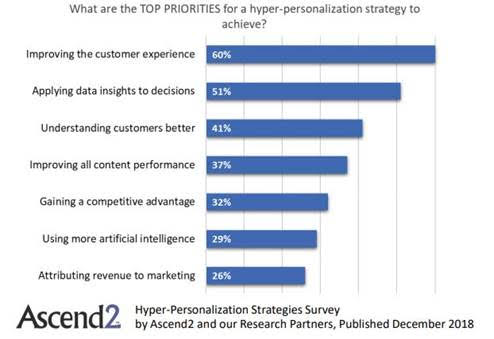
Keep your top priorities in mind as you create your hyper-personalization plan and refer back to your priorities as you evaluate your strategy. Ask the question: Is my strategy meeting my top priorities? Be careful not to implement a “cool” technology if it is not helping you meet your top priorities.
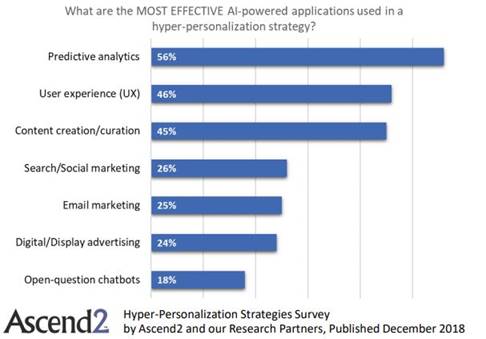
Tactically, the AI-powered applications used most effectively in a hyper-personalization strategy are predictive analytics, user experience (UX) and content creation/curation applications. If you need a place to start, review what is most effective based on the research below and determine what the best fit for you is. If content marketing is a primary marketing tool for your company, examine AI-powered apps that can be used in a hyper-personalization strategy. There are some great CMS tools that use AI to achieve amazing personalization of content.
A total of 86% of marketing professionals consider the effectiveness of an AI-powered hyper-personalization strategy to be changing for the better, with nearly one-third (31%) considering the change to be significant. So your investment in AI-powered hyper-personalization will make a positive change – you just need to get started!
86% of marketing professionals consider the effectiveness of an AI-powered hyper-personalization strategy to be changing for the better.
Click To Tweet
You can review the entire Hyper-Personalization Strategies Survey Summary Report for guidance on creating your email and content marketing strategy.
Hey guys,
I studied chemical engineering in undergrad and conducted a lot of materials and tissue engineering research. I am now working as a research tech doing primarily molecular biology, developmental/blood/stem cell biology focusing on translatable differentiation cultures for the clinic. I am trying to transition in the next few months to industry and need some insight into how does someone with a similar background function within an industrial firm with my background? Next are there any tips anyone can give me on applying/hiring process? Lastly, can anyone suggest some companies that are on the smaller side that would be in the realm of cell/gene therapy?
submitted by /u/slandry24
[link] [comments]
Kentucky’s 27-24 victory over Penn State in the VRBO Citrus Bowl at Orlando, Fla., on New Year’s Day led to an outpouring of reaction on social media …
Google Ads amounts to billions of dollars in revenue for the search engine giant, but what about your revenue?
Standing out in this competitive-and, let’s face it, cluttered-environment can be a huge challenge for advertisers, especially if they’re just starting out. There’s only so much space on a search results page to go around, after all.
As we enter the 2018 holiday season, it’s the right time to take a good, hard look at your stale ads. It’s time to breathe some new life into them.
With that in mind, here are the features the pros use to stand out from the competition:
Google made their standard text ads larger by introducing expanded text ads (ETAs) in 2016. The increased character count was a boon for advertisers because it enabled messaging to reflect more of the advertiser’s key incentives.
Experts jumped on this new format immediately, even though Google didn’t require they switch until January 2017. Even then, advertisers could continue to run standard (shorter) ads, but they couldn’t edit them or launch new ones.
Some people hesitated, but advertisers who were slow to switch were at a disadvantage compared to those who immediately moved to the new format. The go-getters ended up with a huge head start since ETAs proved to have higher clickthrough rates (CTRs) than standard ads.
(And good CTRs = good quality scores = lower CPCs = better ad positioning.)
In August, Google further expanded their text ad format-expanded expanded text ads?-but taking advantage of these new character limits is still optional (hint: you should use them).
The latest iteration of expanded text ads introduces a second headline and more characters to all text fields, making text ads even more prominent. Here’s what’s new:
And here’s a comparison of the three ad formats:
These longer character counts may not sound like much-oh boy, ten more characters!-but they add up and can have a significant impact on how your ads look (and how they convert). See for yourself how the three types of ads look in a side-by-side comparison:
The new ETAs feature up to 218% more text than the original “standard” format. As expected, search experts are already updating their ads to capitalize on the latest change-and this time you should too!
Even though the extra headline and description won’t show up all the time, they’ll help you stand out when they do by making the ad itself bigger. The third headline also gives you an extra thirty characters of highlighted blue text at the top of your ad.
Ad extensions are optional snippets of text that users can append to their ads. Google introduced the first extension-sitelinks-way back in 2009. These short links appear beneath the ad and direct searchers to different pages of the advertiser’s website.
But why stop there? There are now ten different types of manual extensions and six automated extensions that advertisers can use to compel more clicks:
On average, an ad’s CTR has the potential to improve by 10-15% per extension. Aside from adding functionality, extensions increase the surface area of your placement and are free to implement, so they’re a no-brainer.
Though every ad extension is potentially useful, there are four (highlighted in yellow above) that you must use (if you’re not already). This is because they’re easy to implement and they allow you to feature critical incentives and information about your business that would otherwise take up valuable ad copy.
Sitelinks are valuable because they allow you to link deeply into your site. The number of sitelinks associated with your ad varies from 2 to 8. A great tip is to create specialty landing pages for each sitelink which are goal oriented and customized to the link. You can customize sitelinks at the ad group level too, making them even more relevant to specific searches.
Callout extensions can be up to 25 characters each and are not clickable. They promote features, benefits, and selling points of your business. They’re also a great way to highlight specific qualities of your business that you don’t have room to showcase in your primary ad copy. For instance, 250 5 star reviews, 5 convenient locations, all credit cards accepted, etc.
Call extensions add a phone number without wasting any of the primary copy. On mobile devices, a callout extension lets people tap a button to call your business directly. Implementing call extensions is quick and easy, so you should include them in all applicable ads.
This extension gives users the option to include a list of products or services beneath their ad. Structured snippets contain a category header (e.g., services) followed by a list of items (e.g., pet grooming, pet sitting, dog training, de-shedding).
Using all of these snippets is a great way to differentiate your ad from competitors’ ads. You can get creative too. For example, if you’re a B2B database host, you could list the features included in your service (e.g., Cloud Automation, Advanced Security, Easy-To-Use Data Browser).
It’s worth noting, though, that when it comes to the categories you can choose, you’re restricted to Google’s preset list. The full list of snippet categories (headers) is available here. Here are some other structured snippet examples based on different ones:
Using a few of the available extensions creates more opportunities to capture your prospects’ attention. It can even push your competition further down the page!
Here’s an example of how an ad would appear if all the above extensions showed at once:
Implementing ad extensions along with the latest ETA format is sure to get advertisers more clicks. Yet this can be a double-edged sword because (sadly) most of us don’t have an unlimited budget.
Fortunately, there are some settings and features that you can (and should) use to minimize clicks from unqualified traffic. The settings we’re going to focus on are bid modifiers, geotargeting, remarketing for search ads (RSLA), ad scheduling, and negative keyword lists.
Bid modifiers, or adjustments as Google calls them, enable you to increase or decrease bids based on when and how people search. Bid modifiers can apply to devices, locations, ad scheduling, and more. Advertisers bid up or down by percentages.
For example, if you want to bid more aggressively on mobile searches, you can adjust your bids to +30% for mobile devices. Likewise, if you want to appear for desktop searches, but would rather pay less for these types of clicks, you can adjust your bids to -30% for desktop devices.
There’s more to geotargeting than just showing your ads in your desired locations. You can also refine where your ads appear by excluding certain locations and regions. You can get granular with this too by increasing or decreasing bids to your targeted areas using bid modifiers.
Geotargeting improves your ROI by minimizing clicks from unqualified prospects (e.g., people outside of your service area, neighborhoods below a certain income threshold, etc.). So it’s well worth the time it takes to set up and refine.
Maybe you’re not open on weekends. Maybe no one is operating the phones after 8 pm every night. Maybe your strongest return on ad spend occurs between the hours of 10 am and 1 pm every day. Once you figure out the best time of day for your ads to appear, you can use scheduling to choose exactly when they show. This is an especially great feature when you have a limited budget.
Remarketing isn’t just for display ads anymore! This feature allows you to target search ads to people who have already visited your site. Your ads then appear when they search on Google for the keywords you’re bidding on. You can either append RSLA lists to existing ad groups or create groups that only show ads if a searcher is on your remarketing list. Google provides detailed instructions for setting up RSLA campaigns. It’s definitely worth investing the time to read.
You can ensure your ad isn’t triggered for undesirable keywords by creating negative keyword lists and applying them at the account, campaign, or ad group level. The new Google Ads interface makes creating and assigning negative keyword lists simple. Create themed lists (e.g., competitors, locations, common terms) and assign them based on account performance or structure.
The good news is that there are things you can (and must) do to make your brand stand out and to ensure it’s reaching the most qualified prospects.
Google gives you some powerful tools to help improve the clickthrough rate of your ads, which contributes to a higher quality score. And, in turn, higher scores help drive down your cost per click, give you a higher impression share, and make your ad more likely to show up than your competitors’. They can even help your ad appear at the top of the search results.
It should go without saying (but we’re saying it anyway) that you should test all ads with different ad copy (and extensions) and then refine them based on actual performance.
Effective ads-even those loaded with ad extensions-are also only part of a good PPC strategy. Landing page optimization, tracking, A/B testing are critical practices for a successful campaign. Setting clear goals is also very important.
It’s also helpful to see what the competition is doing by reviewing competitor ads, landing pages, and incentives. Google’s Auction Insights report allows you to see who is bidding against you and their impression share compared with yours. Make sure you’re reviewing your competitive data monthly or quarterly. It can help you plan and revise your keyword and ad copy strategy.
Industry tools like SEMRush, KeywordSpy, and SpyFu also provide competitive information and enable you to automate monitoring. They’re worth checking out-you can be sure that most experts use them!
Even if you don’t dig deeper into the competitive data, however, implementing the above settings and ad extensions-as well as taking advantage of the latest expanded text specifications-will put you ahead of the competition. So get started today!